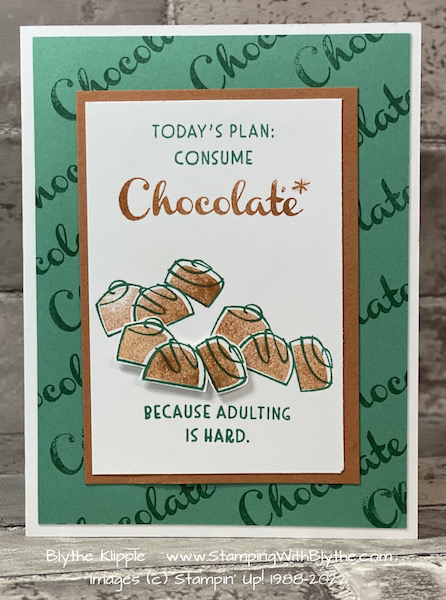
I thought I had come up with a fairly simple card to share with my group of twelve stampers at our semi-monthly class at the Avimor Community Center last week. But……that simple bit of changing colors and words proved otherwise! It does take time to get the right color and the right goodie sent around the tables while letting everyone get the color and image of their choice. The group, which does vary from session to session, always has a great time chatting as these supplies are moving around the room. It’s a great way to make new friends and get to know one another.
Prepping for these cards was definitely the easy part!
- Card Front: Basic White Thick card stock: 8-1/2″ x 5-1/2″, scored at 4-1/4″
- Layer 1: Just Jade card stock: 5-1/4″ x 4″
- Layer 2: Cinnamon Cider card stock: 3″ x 4-1/4″
- Layer 3: Basic White card stock: 2-3/4″ x 4″
- Pop-up layer: Basic White card stock scraps

Product List
|
|
|
||
|
|
|
|
|
|
|
|
|
- Step 1: Just Jade card stock: using either Just Jade or Cinnamon Cider Classic Ink, stamp the word of your choice — CHOCOLATE, COFFEE or COOKIES — diagonally from top to bottom.
- Attach the layer to the card front.
- Step 2: Attach the Cinnamon Cider card stock layer to the card front.

- Step 3: Basic White card stock:
- Using either Cinnamon Cider or Just Jade Classic Ink stamp
- the greeting: “Today’s plan: consume” at the top of the layer
- the greeting: “Because adulting is hard” at the bottom of the layer
- stamp CHOCOLATE, COFFEE or COOKIES under ‘consume’.
- Using either Cinnamon Cider or Just Jade Classic Ink stamp

- Step 4: Stamp your treat of choice outline image two times in either Just Jade, Cinnamon Cider or Early Espresso classic ink
- I recommend Early Espresso for the outline of the cookies (and chocolate chips) and perhaps the bon bone.
- Stamp a third of image of choice on a piece of scrap paper to cut out (die or scissors) after you stamp the center.
- Stamps center images in the color of your choice. I recommend stamping of the ink on a piece of scratch paper to light the color intensity for all of the centers, cookies especially.
- Attach this layer to the card front.

- Step 5: Die cut (coffee cup/bon bon) or fussy cut (cookie) third images.
- Attach third images to card using Dimensionals.
- DONE!!!

If you need supplies for duplicating today’s cards, click on any of the supply items above and you’ll fly right to my Online Stampin’ Up! store. Please select me as your demonstrator and order away. 🙂 This month’s host code is J7ZTQ63B. At the end of month I’ll send you a thank you gift for shopping with me.
Which item: coffee, bon bone, or cookies would be your favorite? I’m thinking mine would be a good cuppa coffee, like maybe a cappuccino. Yum.
Happy stamping to you! Please feel free to email, or text, me at any time with any questions you may have about our Stampin’ Up! products. I’m always happy to help in any way I can. I do my best to post regularly on my BLOG and would love to have you subscribe ~ StampingWithBlythe.com. (the caps aren’t necessary–they just make it easier to read)
* Shop Stampin’ Up! in Blythe’s Store * Like my Facebook Page * Follow me on Pinterest * Join Paper Pumpkin and play along * Join My Country Loft Team


