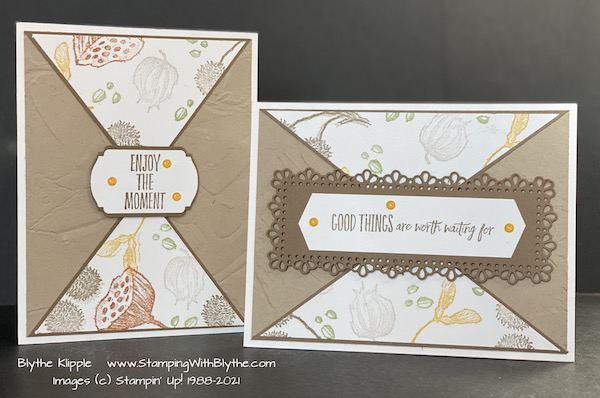
Today’s card is kind of fun. It started out as a ‘mystery card’, following stamping instructions without knowing exactly where I was going. Bottom line, I created a piece of Designer Series Paper that I could call my own. I forced myself to use a stamp set I hadn’t used before since I wasn’t quite sure what I wanted to do with it. This project worked out perfectly.
I, along with other attendees, received the Enjoy the Moment stamp set in my bag when attending Stampin’ Up!’s online On Stage event in November.

I really like the set but was unsure about how to handle it. I could only ‘see’ brown and beige images. And that’s why I pulled it out to create my card…….not having a clue at first that I would be creating a background paper.
Product List + the Enjoy the Moment stamp set shown above:
|
|
||
|
|
|
|
|
|
|
|
|
|
|


Here’s how the card developed:
- Basic White Thick card stock: 8-1/2″ x 5-1/2″, scored at 4-1/4″ and set aside
- Basic White card stock: 3-3/4″ x 5″ plus a scrap for the greeting which will be punched out
- Randomly stamp images from the stamp set using a variety of colors, turning the card stock as you do so, creating random spacing of images.
-

Clear Blocks for mounting your images 
-

Cut diagonally from opposite corners twice, creating 4 triangle pieces


- Crumb Cake card stock: 4″ x 5-1/4″, run through the Stampin Emboss Machine using the Painted Texture Embossing Folder
- Attach this layer to the card front using adhesive of your choice
- Soft Suede card stock: 4″ x 5-1/4″, cut using the paper trimmer, diagonally from corner to corner, creating 4 triangles.


- These four triangles will create two cards—just add an appropriate greeting:


Now it’s time for you to create your own Designer Paper. Use any stamp set with smaller images, using any color ink and card stock for totally different looks for this technique. Try it. You’ll like it. Share what you do in a comment below please.
If you’re interested in purchasing any of the products used for today’s cards, please either click on the item image way above or just click here to go directly to my Stampin’ Up! online store. And be sure to use February’s Host Code if your order is under $150. I’ll send you a little gift at the end of the month. If you order is over $150 then be sure to use the reward $$ you have earned.

Don’t forget that February is the last month of 2021’s SALE-A-BRATION event, Stampin’ Up!’s time to shower us with free limited edition stamps with each $50 order. Click here and here to review the offered products.
* Shop Stampin’ Up! in Blythe’s Store * Like my Facebook Page * Follow me on Pinterest * Join Paper Pumpkin and play along * Join My Country Loft Team