For sure it’s totally refreshing to sip a cool glass of lemonade on a hot or even warm day. I think today’s card invites you right out onto the back patio to enjoy such a treat.
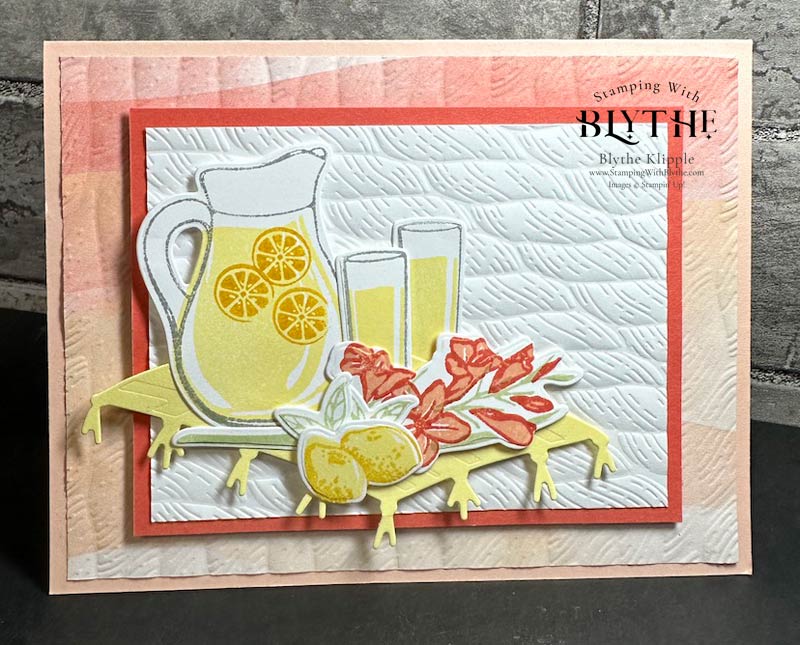
I’ve been wanting to sit down with this stamp set, So Refreshing, since it first found its way into my stampin’ studio. And I found out you really have to pay attention when stamping these images in preparation for die cutting. Silly me stamped the flowers here, the stems there and the lemonade that should be inside the pitcher, next to it. Same with the contents of the glasses.
Actually, what you need to do — which I did the second time around — is to stamp the outline images for the pitcher and the glasses and then “fill” them with the lemonade images. And here I thought I was so smart! 🙂

Stamp pitcher using Smoky Slate Classic Ink. Stamp ‘lemonade’ using Lemon Lolly Classic Ink. And then finally stamp a few lemon slices using Crushed Curry Classic Ink. Then die cut the image on the right!


Supplies Used for Today’s Lemonade Card
Product List  |  | |
 |  | |
 | ||
 Crushed Curry Classic Stampin’ Pad [131173] $6.50 | ||
 |  |  |
 |
")

 Designer Series Paper")


You can click on any of the images above to be taken directly to my Stampin’ Up! store to view the products close-up or to purchase them if you so desire. The stamp set and dies can be purchased individually or, you can save 10% by purchasing the two items as a bundle.
TIPS & MEASUREMENTS for Prepping this Card
- Petal Pink Card Base: 8-1/2″ x 5-1/2″, scored at 4-1/4
- Designer Series Paper layer: 5-1/4″ x 4″
- Calypso Coral layer: 4-1/4″ x 3-1/4″
- Basic White layer: 4″ x 3″
- Basic White scraps for stamping and die-cutting
- You’ll also need: Paper Trimmer, stamps for greeting, Dimensionals, Cut & Emboss Machine
Assembly
- Run both the Designer Series Paper (DSP) and the Basic White card stock through the Stampin’ Cut & Emboss Machine using the embossing folder of your choice. I used the Twister Rope 3D Embossing Folder.
- Attach, using the adhesive of your choice, the DSP layer, the Calypso Coral Layer and then the Basic White layer.
- Attach your die cut images in any positions that please you. I added Dimensionals under the table mat, the pitcher, one glass, and the lemons. The rest I attached with Multipurpose Liquid Glue.
- I’m holding off on attaching a greeting until I know what the occasion is, like birthday, thank you, just a note……..
If you’d like to order any of the products used in today’s project you can either click on their images above and be directed right into my Stampin’ Up! store or send me an email and I’ll gladly place your order.
Thank you so much for popping in today. Please leave a comment below if you’re looking for a specific project or technique. And don’t forget to make a card and then make someone’s day by sending it to them.