
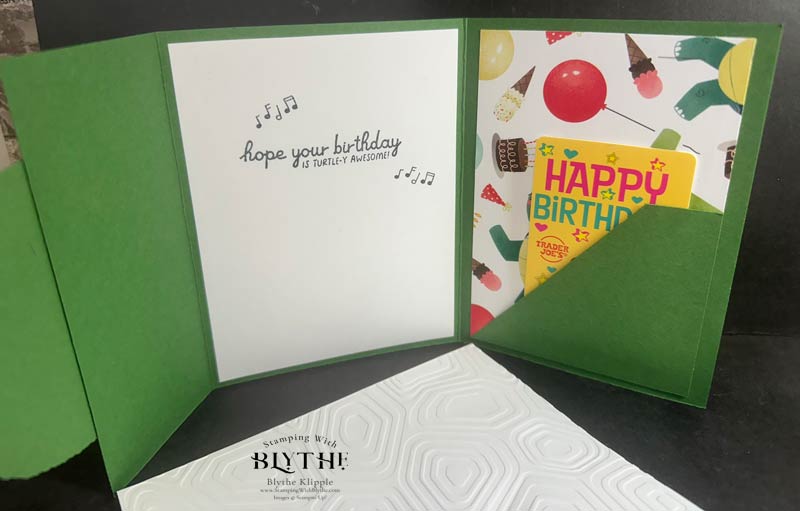
Our first grandson has turned twenty-one today. (Actually now his birthday was yesterday, the 25th.) Not so long ago he was just that little guy running back-and-forth across the family room saying “one more time!” It really was just a few years ago wasn’t it? And now he’s a musician–for his age group! That’s why I chose the Turtle-y Awesome stamp set for his birthday card.
Here’s the how-to for this card: I started with a 10-1/2″ x 5-1/2″ piece of card stock, Garden Green. Scoring is at 2-1/4″ and 6-1/2″.
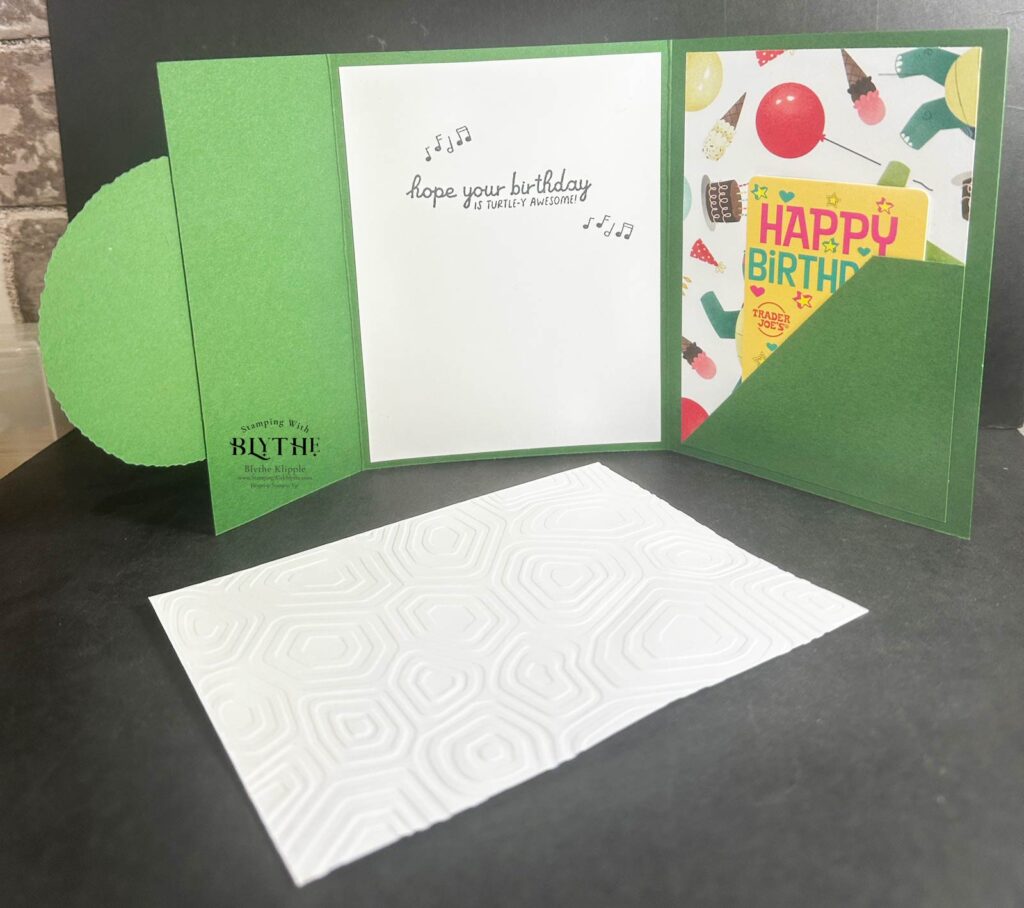
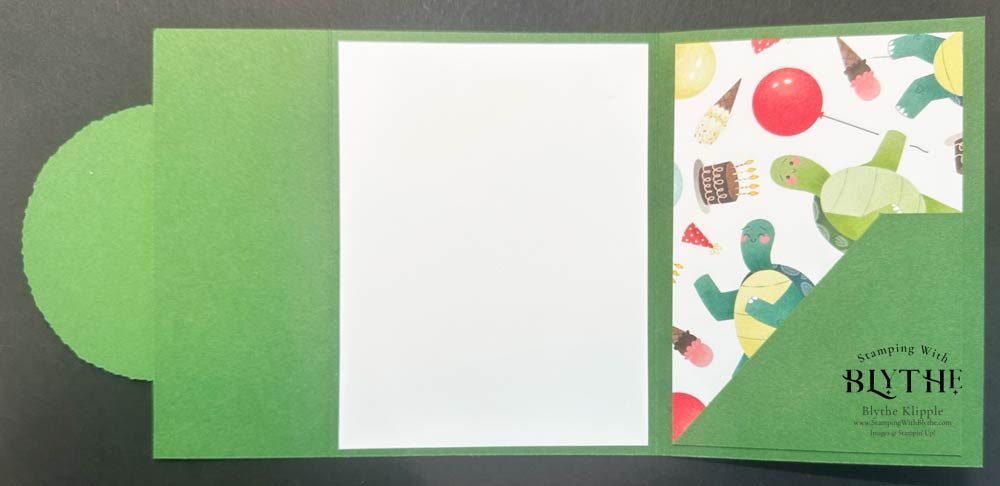
The two DSP layers and the Basic White layer are each 5-1/4″ x 4″. The second piece of DSP is on the reverse side of the DSP layer shown below.
The gift card pocket is on the right side of the card above. Instructions follow shortly.

The finished card is now ready to hand off to the birthday boy/man.
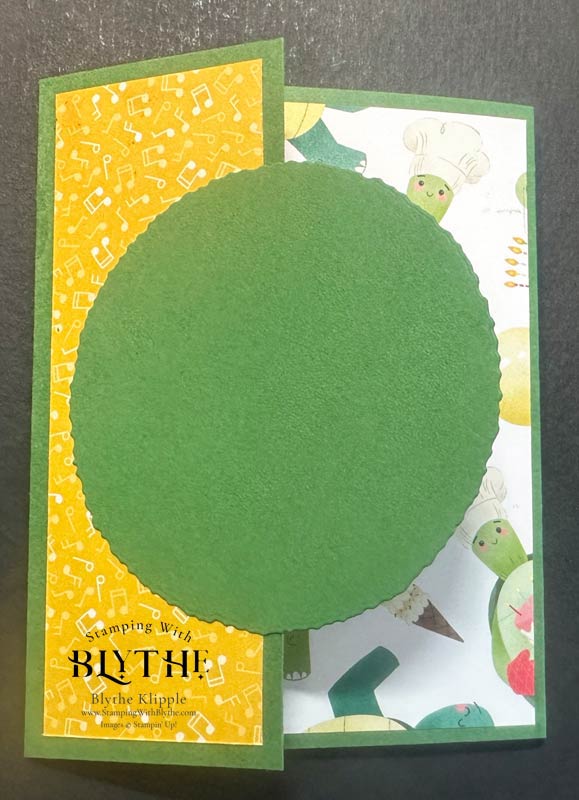
I used the Deckled Circles dies to die cut the Garden Green/Basic White accent layers on the card front: numbers 7 and 8 counting toward the center of the grouping. (see photo above) Because Ozzie is a ‘heavy metal guitarist’ I chose to base my card on the only semi-musical set in the catalog at the moment: Turtle-y Awesome. And I managed to use every bit of the bundle—stamps, dies, and embossing folder.
How do you like the envelope (above, in front of the card)? It was a last minute whim, using the Turtle Textures Embossing Folder and it worked perfectly. No torn envelope at all.
Product List ![Turtle Y Awesome Dies [ 165228 ]](https://assets1.tamsnetwork.com/images/EC042017NF/165228s.jpg "Turtle Y Awesome Dies [ 165228 ]") | |||
![Basic White 8 1/2" X 11" Cardstock [ 166780 ]](https://assets1.tamsnetwork.com/images/EC042017NF/166780s.jpg "Basic White 8 1/2\" X 11\" Cardstock [ 166780 ]") | ![Deckled Circles Dies [ 162286 ]](https://assets1.tamsnetwork.com/images/EC042017NF/162286s.jpg "Deckled Circles Dies [ 162286 ]") | ![Tuxedo Black Memento Ink Pad [ 132708 ]](https://assets1.tamsnetwork.com/images/EC042017NF/132708s.jpg "Tuxedo Black Memento Ink Pad [ 132708 ]") | |
![Stampin' Cut & Emboss Machine [ 149653 ]](https://assets1.tamsnetwork.com/images/EC042017NF/149653s.jpg "Stampin' Cut & Emboss Machine [ 149653 ]") | |||
![Mini Stampin' Dimensionals [ 144108 ]](https://assets1.tamsnetwork.com/images/EC042017NF/144108s.jpg "Mini Stampin' Dimensionals [ 144108 ]") | ![Tear & Tape Adhesive [ 154031 ]](https://assets1.tamsnetwork.com/images/EC042017NF/154031s.jpg "Tear & Tape Adhesive [ 154031 ]") | ![Paper Trimmer [ 152392 ]](https://assets1.tamsnetwork.com/images/EC042017NF/152392s.jpg "Paper Trimmer [ 152392 ]") | ![Basic White Medium Envelopes [ 159236 ]](https://assets1.tamsnetwork.com/images/EC042017NF/159236s.jpg "Basic White Medium Envelopes [ 159236 ]") |
![Turtle Y Awesome Photopolymer Stamp Set (English) [ 165223 ]](https://assets1.tamsnetwork.com/images/EC042017NF/165223s.jpg "Turtle Y Awesome Photopolymer Stamp Set (English) [ 165223 ]")
![Turtle Textures Embossing Folder [ 165232 ]](https://assets1.tamsnetwork.com/images/EC042017NF/165232s.jpg "Turtle Textures Embossing Folder [ 165232 ]")
![Garden Green 8-1/2" X 11" Cardstock [ 102584 ]](https://assets1.tamsnetwork.com/images/EC042017NF/102584s.jpg "Garden Green 8-1/2\" X 11\" Cardstock [ 102584 ]")
![Turtle Y Cute 12" X 12" (30.5 X 30.5 Cm) Designer Series Paper [ 165221 ]](https://assets1.tamsnetwork.com/images/EC042017NF/165221s.jpg "Turtle Y Cute 12\" X 12\" (30.5 X 30.5 Cm) Designer Series Paper [ 165221 ]")
![Gray Granite Stampin' Blends Combo Pack [ 154886 ]](https://assets1.tamsnetwork.com/images/EC042017NF/154886s.jpg "Gray Granite Stampin' Blends Combo Pack [ 154886 ]")
![Lemon Lime Twist Stampin’ Blends Combo Pack [ 161682 ]](https://assets1.tamsnetwork.com/images/EC042017NF/161682s.jpg "Lemon Lime Twist Stampin’ Blends Combo Pack [ 161682 ]")
![Old Olive Stampin' Blends Combo Pack [ 154892 ]](https://assets1.tamsnetwork.com/images/EC042017NF/154892s.jpg "Old Olive Stampin' Blends Combo Pack [ 154892 ]")
I really enjoyed making this card for Ozzie, not knowing at all what I was using or how I was going to proceed as I got started. I just knew I wanted those musical notes and this set was the closest I could find to something that wouldn’t make the kid gag! 🙂 Like “Oooooh, Oma!” I also knew I needed to made a card that would hold a gift card. Mission accomplished.
The most “difficult part” was the pocket for the gift card. Not really!!
- After scoring and folding your card base at 2-1/4″ and 6-1/2″, add the appropriate piece of DSP or card stock. The Basic White card stock and two pieces of DSP are all cut to 5-1/4″ x 4″. The small front flap DSP is 5-1/4″ x 1-7/8″.
- When you close your card you’ll find the second piece of DSP on the “backside” of what you’re looking at in the image above (on the right side).
- Die cut two circles, one using Garden Green card stock and the larger of the 2 dies and Basic White using the remaining die. Attach those two layers and then apply “green glue” (Multipurpose Liquid Glue or glue of your choice) to 1/2 (looking at it left to right) of the layer and attach it to the 4-1/4″ x 5-1/4″ piece. You can see where it’s hanging on on the second image above.
- The flap that holds the gift card is a 4″ x 3″-4″ scrap of card stock. It just needs to fully cover the lower DSP layer. Lay it over that DSP layer and make tick mark about 1″ from the right edge. Use your Paper Trimmer to cut diagonally to the bottom left corner. Apply Tear & Tape to the bottom and right sides and attach the layer to the card creating a perfect little pocket. Just add your gift card.
Thanks so much for popping in today. And don’t forget how important it is to not only MAKE a card, but to also SEND your card. Nothing’s better than to find a personal card addressed to YOU, from a friend, in your mailbox rather than just more junk mail and bills.
If you’re interested in any of the supplies I used in today’s birthday card or if you’d like a personal catalog, please reach out to me. blythe@stampingwithblythe.com . I would be more than happy to help you. And if you make your own gift-card-holding card please share it with me. I’d love to post it here on my blog. Have a good week. And THANK YOU to those to whom we give honor today, Memorial Day.


