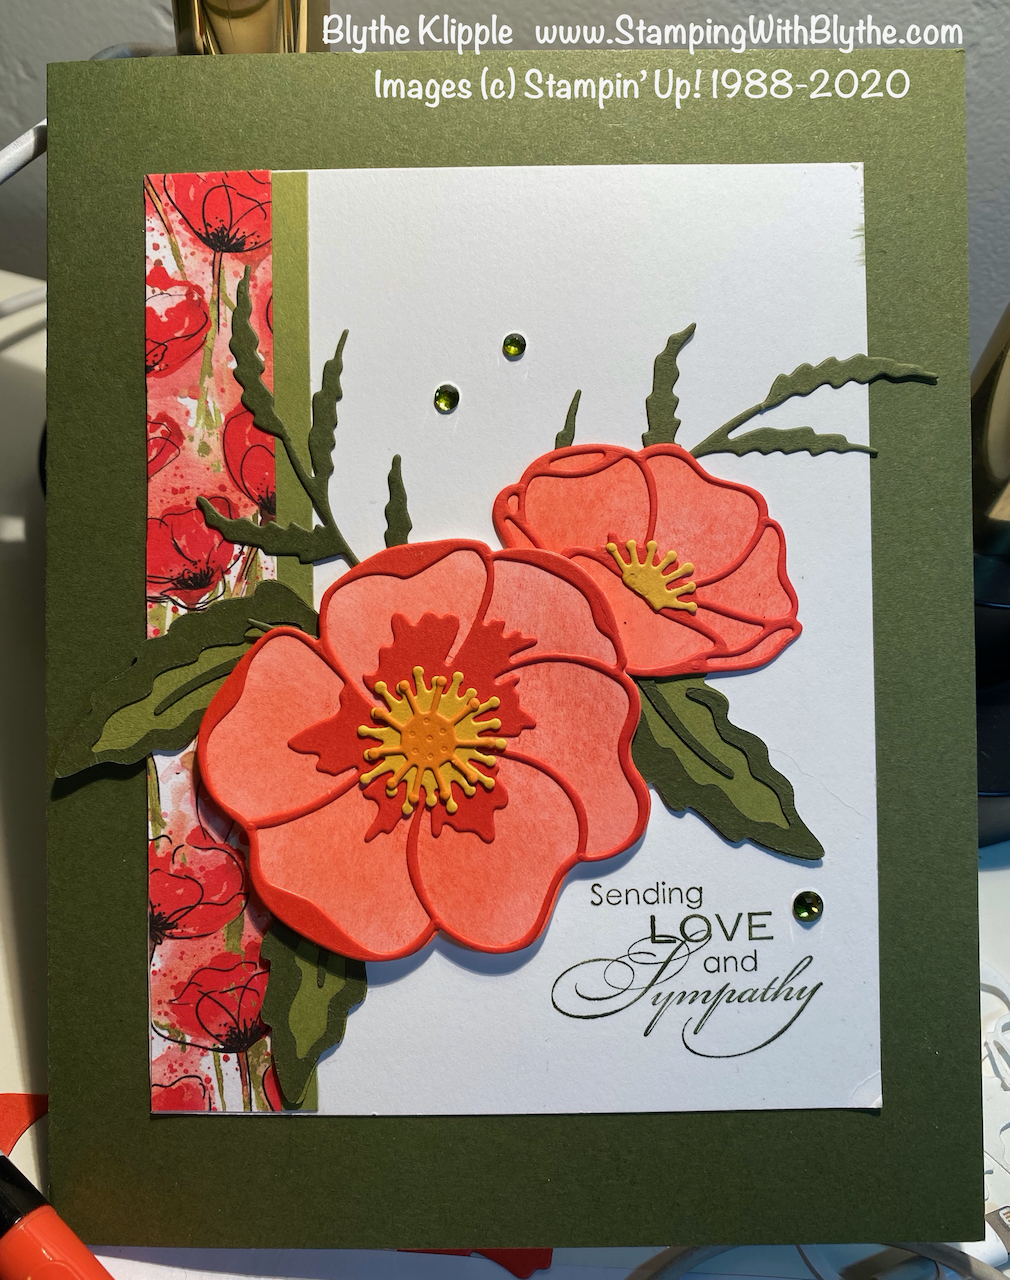
I was requested yesterday to make a special sympathy card for a dear friend. And I was asked to please make it large enough for office staff to sign. Well, my stamping space is about 95% set up in our new home here in Boise, so I was anxious to get started on a real project in real time. Like–get ‘er done today! My choice was to create a Pretty Poppies sympathy card.
I started by creating a standard A-4 card, 5-1/2″ x 4-1/4″ on Whisper White card stock. Then I layered that card front onto a folded piece of Mossy Meadow card stock, 11″ x 7″, scored at 5-1/2″ and folded in half. As always I burnished the fold using my Bone Folder. To burnish: Rub gently but firmly over the crease with a bone folder for a crisp fold.
The Peaceful Poppies Suite of products has been on my desk, quietly shouting “use me, use me soon” for several days so those are exactly the products I used. They’re from the newly released January-June 2020 Mini Catalog. Plus I had to resort to several retired products which I’ll point out below.
Inside:

Product List used for today’s card:
|
|
||
|
|
||
|
|
|
|
|
|
|
|
|
|
Retired items that I used…..and why…..
I chose to use the retired Love & Sympathy stamp set because of the messages conveyed.
I’m still using the Sizzix Stampin Up! Big Shot because I’m fortunate enough to have it. I’ll hold on to it and use it until Stampin’ Up! comes out with their new version sometime after the release of the 2020-2021 Annual Catalog in June 2020. That date has not yet been released.
Because my card is oversized, I needed to make a custom size envelope. So I turned to the now retired (hey, I’m not in charge of retiring products!) Envelope Punch Board. I also still have a few sheets of the retired 2015-2017 Envelope Paper, one color of which was perfect color and weight for the envelope for my card. I’m sorry I didn’t get a photo of it.
When using those very fine dies with thin little pieces, I thought it would be easier to adhere them to the card front using the retired sticky transfer paper rather than trying to carefully place little dots of the Tombow Multipurpose Glue.
Here are some tips for putting the card together:
- The Whisper White smaller ‘card front’ layer is 5-1/2″ x 4-1/4″.
- The two inside Whisper White layers are 5-1/4″ by 6-3/4″.
- Die cut the two larger poppies using Whisper White card stock (regular) and color it using a segment of sponge* and Poppy Parade Classic Ink. You get nice variations of color tones this way.
- I used Old Olive card stock for the solid leaves and Mossy Meadow for the outline and the silkier fern-like leaves.
- I used Crushed Curry and Pumpkin Pie card stocks for the flower centers.
- The Peaceful Poppies Designer Series Paper (DSP) pieces measure for the left edge (1″) and bottom trims on the inside (1/2″).
- The Old Olive strip adjacent the DSP strip is 1/4″ wide.
- Everything except the large poppy was attached using Snail Adhesive or Tombow Multipurpose Glue. The larger poppy was attached using Stampin’ Dimensionals.
- * TIP: I cut a Stampin’ Sponge in half with large scissors and then cut each half into thirds and I store the sponge pieces and daubers in a Full Wide Stamp Case. (Stock up–they’re really useful for things other than stamps.)

My finished card is now in the mail and will reach its destination in a few days if all goes well. I enjoyed making this card as a special request and I loved using all the new Poppy Parade elements.
It’s still going to take awhile to get back into my normal card making rhythm and I do so enjoy the time spent creating. In the meantime, if you need any Stampin’ Up! supplies or catalogs please let me know. I’m happy to stop unpacking boxes and take some time to craft and create. Or place an order for you or guide you to placing your own online order. I am always available to you when you have a problem or questions.


