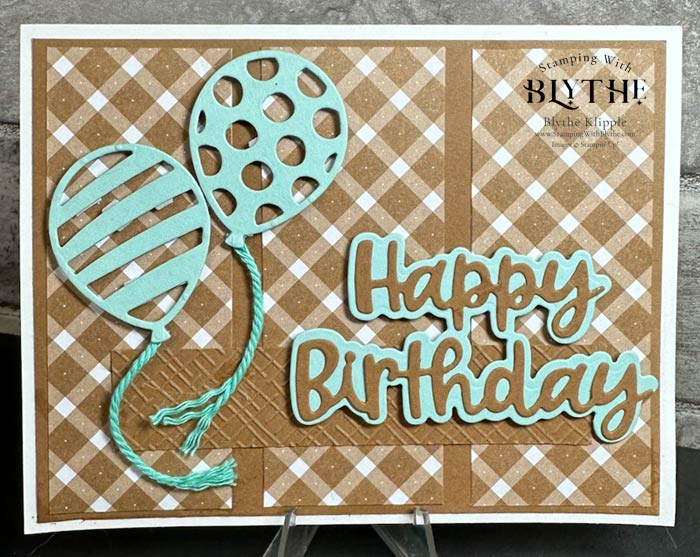
Last weekend my first grandson turned twenty years old! Ouch and wow! Creating a cool card for a cool wanna be rock star and heavy metal guitar player was a bit daunting for me. At the last minute (sort of ) I came up with this clean, simple, quick and easy card and HE LOVED IT!

I didn’t want it to be too fussy……….just kind of mellow. I was a bit worried about the balloons (is he too cool for balloons now?) but he seemed quite pleased.
Supplies Used
Putting the Supplies Together
- Card Base: Basic White Thick card stock: 8-1/2″ x 5-1/2″, scored at 4-1/4″ and folded.
- Next Layer: Pecan Pie card stock: 5-1/4″ x 4″, adhered to card front using Multipurpose (aka ‘green’) Glue.
- Designer Series Paper layer: 3 pieces, 3-3/4″ x 1-3/4″. Attach one piece to the left side, the next piece to the right side and the final piece in the middle, also using ‘green glue’.
- Pecan Pie scrap: cut a 3/4″ x 3-1/2″ piece and run it through the Cut & Emboss Machine using the Basic 3D #3 Embossing Folder (or folder of your choice since this one is now unfortunately retired). Attach it across the DSP layers as shown, using ‘green glue’.
- Coastal Cabana card stock: die cut one of each of the Balloon Pop-Up Thinlits Dies balloons and attach them to the previous layers using Stampin’ Dimensionals. Trim the Dimensionals to smaller pieces as needed.
- (unlisted): String or Twine: attach a 2″ piece of twine to each balloon, purposely fraying the ‘hanging’ end. Add a tiny drop of ‘green glue’ to the each piece of twine to secure it to the card front.
- Pecan Pie card stock: die cut the Happy Birthday image from the Wanted To Say Dies; the die cut the corresponding base using a Coastal Cabana card stock scrap.
- Gently place dots of Fine-Tip Glue to the back of the Happy Birthday layer and attach it to the Coastal Cabana layer. Attach to the card front using Dimensionals.
Well now…………I have been unable to upload images of Ozzie’s card showing closeups of the balloons and greeting. Fortunately the original image is bold enough to show you the details.
You can adapt this layout to any card base, designer series paper and die cut pieces. I hope you try it out–and share your results with the rest of us. Just send your image/photo to Blythe@stampingwithblythe.com and I’ll post it here on the blog. I’d love to see your ‘take’ on the layout.
Thank you so much for popping in today. Please leave a comment below if you’re looking for a specific project or technique. And don’t forget to make a card and then make someone’s day by sending it to them.


