It’s been crazy time in my life by my own making! I decided in mid-October to take a 10-day driving trip to California to visit friends and old haunts. The old haunt was the ‘cabin’ we’d owned for 34 years before moving to Idaho. That was not an easy haunt to leave behind but we did it. And we’re very happy to now be in Idaho, away from fires and very tall trees that can come crashing down in the night so to speak.
Needless to say I did zero stamping while traveling. But I did return, prepared-in-advance, for my bi-monthly stamping class at the Avimor Community Center. As always we had a grand old time stamping and chatting and stamping some more. With usually 12-15 stampers everyone has to patiently wait for supplies to travel down the tables. I’m only one person and I have only one set of most supplies. It works! Stampers can chat, laugh and get to know neighbors they hadn’t previously met……or chat/giggle with already good friends. A little ding-a-ling of my bell quickly brings them all back to attention for their next instruction.
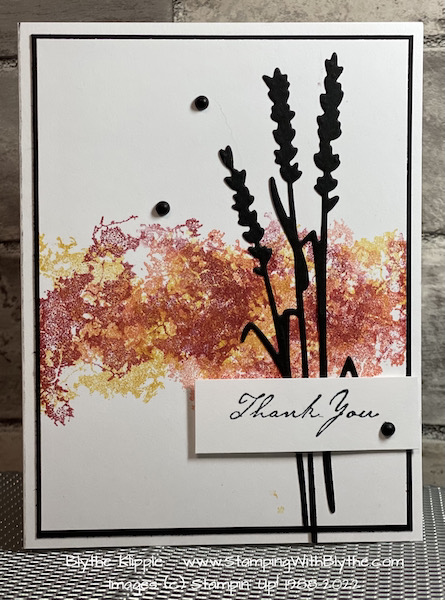
My goal is to make one random/seasonal card each month before Christmas and one Holiday card. So here’s the first card we created on the 4th of November:

This is definitely a favorite anytime (depending upon colors and stamps) layout for a card. Clean and simple.
Product List
|
|
|
||
|
|
|||
|
|
|
|
|
|
|
|
|
|
|
|
|
|
Basic White Thick card stock: 8-1/2″ x 5-1/2″, scored at 4-1/4″ and folded for the card base.
Basic Black card stock: 5-1/4″ x 4″ plus scrap for die cutting
Basic White card stock: 5-1/8″ x 3-7/8″ plus scrap for greeting
The ‘trickiest’ part of this card is the very first stamping step:
- Ink up one of the three main colors, Bumblebee, Calypso Coral or Cherry Cobbler, stamp it off* once (or twice for darker colors) on scrap paper and then stamp it on the middle of the top Basic White layer of card stock. Repeat 3-4 times, marching the image left to right across the layer.
- Then repeat with each of the other two colors.
- Stamp it off means to stamp the inked up image once or twice on a piece of scratch paper (or your grid paper), removing a bit of ink so when you actually stamp the image on your card layer, it will be lighter.
There is no right or wrong to the placement of these ‘splotches’!
- Attach the stamped layer to the Basic Black layer using the adhesive of your choice. I usually prefer “green glue”, aka Multipurpose Liquid Glue, because you can move the layer around a bit for perfect placement before it ‘sets’ permanently. Just apply a thin line (maybe squiggle it a bit rather than having it just perfectly straight) of the green glue (named for the container, not the actual glue), around the edges of the card layer being sure to get a bit in each corner.
- Attach these two layer to the card front using at least five Stampin’ Dimensionals.
Set these layers aside.
- Using the Stampin’ Cut & Emboss Machine, Basic Black card stock and the tall flower/wheat image, die cut the image.
- Place small dots of ‘green glue’ strategically on the back of the die cut image and lay it on top of the previous stamped card layer.
- Using Tuxedo Black Memento Ink, stamp your greeting on a Basic White scrap.
- Attach this stamped layer to the card front using Stampin’ Dimensionals.
- Attach 3 Matte Black Dots to the card front.
- DONE. Oh yeah..be sure to add your name to the back side of the card, as well as the date, so your recipient will know exactly WHO created the card and when. I’ll often use a small image from the stamp set just above my name/date just for cuteness.
Will you be placing an order today? If yes, and if you don’t already have a Stampin’ Up! demonstrator with whom you work/play, please consider shopping in my Stampin’ Up! Store. When you do, please use the monthly hostess code, PXMUETF9, when prompted at checkout to earn free product from me. If your order is $150 or more, no need to add the code so you can earn your own hostess rewards! Thank you so much for supporting a small business owner!
* Shop Stampin’ Up! in Blythe’s Store * Like my Facebook Page * Follow me on Pinterest * Join Paper Pumpkinand play along * Shop Stampin’ Up!’s Clearance Rack and save up to 60% * Join My Country Loft Team


