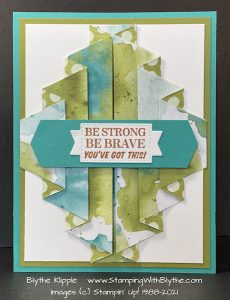
Don’t let that title, Double Pleat Fancy Fold Cards, or description put you off. Actually it did put me off for several weeks until I finally tried it yesterday. After I made my first/prototype card I made another card. And another card. I used the Ice Cream Corner Designer Series Paper for all three cards.

Let’s get started.
To make the pleated fold you need to start with a piece of 10″ x 5″ DSP. Score at 1, 1-1/2, 2-1/2, 3, 4, 4-1/2, 5-1/2, 6, 7, 7-1/2, 8-1/2, 9. Then mark both short sides at 2 and 3 inches and cut from that point to the center score lines. Note green “asterisked” markings on sample below.


Do you prefer the Terra Cotta layer (above) or the Blackberry Bliss layer (below) that then is attached to the card front/base?

More Double Pleat Fancy Fold cards:


I’d be happy to send any of these card to any lucky recipient knowing that they all look great, even the one with the semi-boo-boo. This Double Pleat card was somewhat outside my comfort zone but I really think it’s fun and definitely quirky. Challenge yourself with different Designer Series Papers. I think you’ll be surprised, as I was, by the outcomes.
Here are the products I used:
|
|
|
|
|
|
|
|
|
|
|
|
|
|
|
|
Tip: I stamped the large background type Many Messages stamp several times, in different colors of ink on Basic White card stock and then ran them through my Stampin’ Cut & Emboss Machine creating a ton of greetings. Tomorrow’s post will elaborate on this process. But for today you can see one of the greetings on this card:

Heads up: Sale-a-Bration ends this coming weekend. Don’t miss out on earning your favorite FREE S-A-B products. Jump on over to my online Stampin’ Store to do your shopping if you don’t already have a Stampin’ Up! demonstrator. Be sure to use the February Host Code when you shop in my store.

Come back tomorrow for more information on the Many Messages stamp set and Messages dies.
* Shop Stampin’ Up! in Blythe’s Store * Like my Facebook Page * Follow me on Pinterest * Join Paper Pumpkin and play along * Join My Country Loft Team


