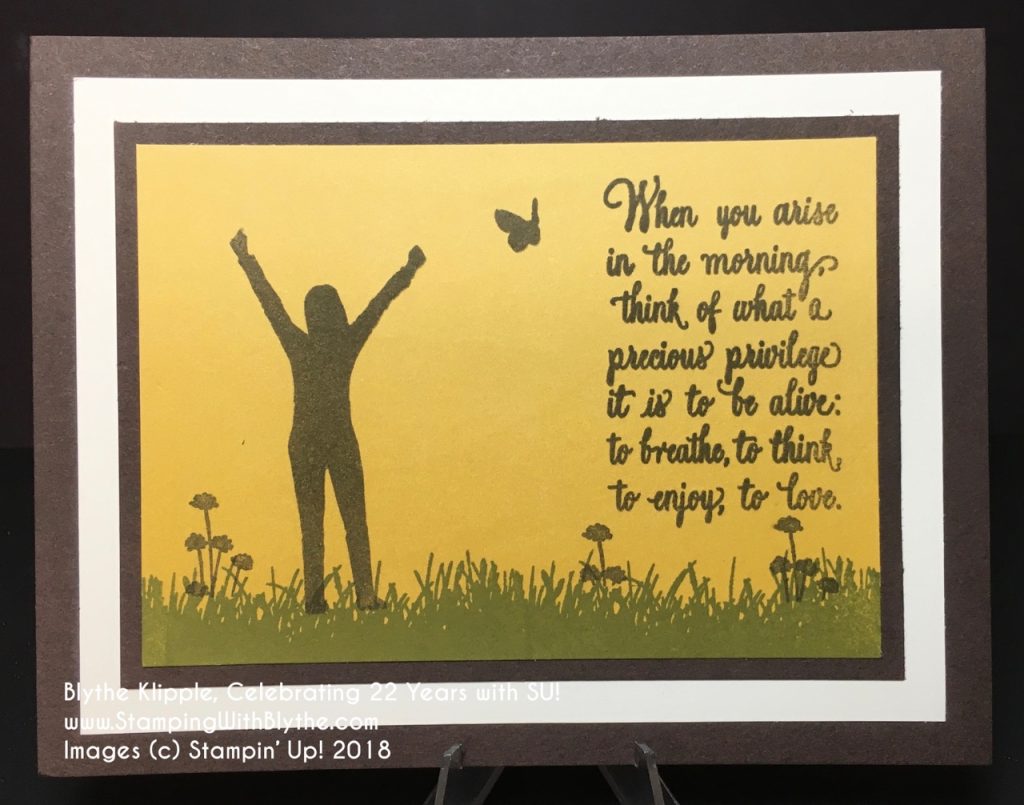
Can’t you just see yourself in a field or on a mountain side or mountain top, raising your arms in joy? Take the Enjoy Life stamp set plus your sponge brayer to make an uplifting card to send to a friend for no reason other than sharing a lovely sentiment.
This clean and simple card is one that I’ve made for a 2018-2019 Annual Catalog card swap with fellow Stampin’ Up! demonstrators. The stamping has been done on just one layer, using just three colors.
Classic Stamp Pads:
|
|
I used the Sponge Brayer to color the Very Vanilla 4-1/4″ x 3″ card stock layer.
Sponge Brayer:
|
|
Gently roll the brayer over the Crushed Curry stamp pad about twelve times, and then roll it over the Very Vanilla card stock, starting at the bottom (or top) and working your way to the top (or bottom). Re-load the brayer with Crushed Curry ink and repeat several times, until the color intensity you’d like has been achieved. You want the color to be stronger on the bottom edge and lighter on the top.
Stamp the grass using Old Olive classic ink, positioning the image just below the bottom of the card stock so the grass only comes up about 1/2″ – 5/8″. Stamp three ‘weed flowers’, also using Old Olive ink, spacing them randomly across the bottom of the card stock.
Stamp the female silhouette, the butterfly and the sentiment using Early Espresso Classic Ink.
TIP: Be sure each of your ink pads are adequately inked. If you have trouble achieving a sharp, well inked image, they need re-inking. I recommend that every time you purchase an ink pad, you also purchase an Ink Refill. You’ll never regret it.
Classic Stampin’ Ink Refills:
How do you re-ink a stamp pad? Have a smooth plastic piece handy, like a Tupperware or Pampered Chef scraper or an old credit card.
Place dots of re-inker in rows all over the stamp pad. Then gently scrape over the dots, working them into the pad and scraping them towards the sides. When they disappear you are done and ready to stamp. Check out this helpful post from 2015!
Here are the other card details you might want:
- Card front layer: Early Espresso: 8-1/2″ x 5-1/2″, scored at 4-1/4″ and creased firmly
- Next layer: Very Vanilla: 5″ x 3-3/4″
- Next layer: Early Espresso again: 4-1/2″ x 3-1/4″
- Stamped layer: 4-1/4″ x 3″
If you need any of these tools or stamps used to create today’s card, just click on the images above (for stamp pads, re-inkers, or brayer) and you’ll be taken right to my Stampin’ Up! online store. If you haven’t already set up an account, please be sure to select me as your demonstrator when you do.
Make someone’s day and create a clean and simple card using the Enjoy Life stamp set plus your Sponge Brayer. There is nothing like receiving an out of the blue, no special reason, card in your mail box. Be prepared to hear the joy in the voice of your recipient.


