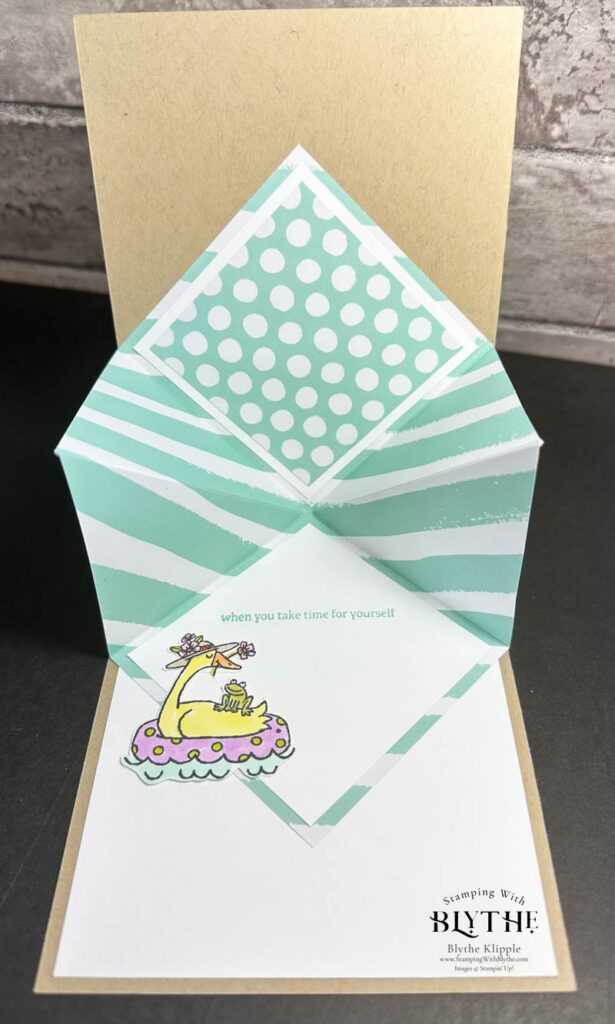
Yes, explosion cards are so much fun both to make and then to share. I just made two such cards, one for a special friend and another for a new neighbor. It took me a short while to determine what papers to use but I finally chose the clean and simple Pool Party pieces from the 6″ x 6″ Subtles Designer Series Papers. And then I knew I wanted to focus on welcome and relaxation so I chose the Lazy Days and Silly Goose stamp sets. Worth a giggle and a smile.

The Lazy Days stamp set has some warm, welcoming, homey phrases and images that are perfect for these explosion cards.

Wouldn’t you love to receive a “permission slip”, like the Silly Goose above, to take a few hours off and really relax?

And this card below is for our new neighbors (whom I haven’t even seen yet!). I think it’s a lovely way to welcome them into our friendly neighborhood.


Cutting Instructions
- Card Base: Crumb Cake, 11″ x 4-1/4″, scored at 5-1/2″ and folded.
- Next Layer: Pool Party, 5-1/4″ x 4″
- Next Layer: Basic White, 5″ x 3-3/4″
- Next Layer: Designer Series Paper (Subtles 6″ x 6″), 4-3/4″ x 3-1/2″
- Accent Layer: Crumb Cake, 2-1/4″ square; Pool Party, 2″ square; Basic White, 1-3/4″ square
- Inside: Basic White, 5-1/4″ x 4″
- Designer Series Paper (DSP) Explosion layer: 6″ x 6″, scored at 3″ on each side and then diagonally from the top right to lower left corners.
- Inside “explosion DSP”: Basic White, 2 pcs., 2-3/4″ square; DSP, 2-1/2″ square
Big Tip
Do all of your cutting of various paper pieces first. Then start assembly. It’s quick and easy to layer those square pieces and then attach them to the larger layered pieces on the card front and eventually inside the explosion segment.
Explosion Fold Instructions
Create the fold by looking carefully at the image above. Collapse folded piece to a square. Apply adhesive (Multipurpose Glue or Stampin’ Seal) to both ‘outside’ squares. Place the folded DSP inside the card so the top of the diamond is touching the inside score (fold) line. Both left and right corners will touch the edges. Close the card and firmly secure both top and bottom ‘flaps’.
Stamp you images as desired, add a few bits of bling and you’re done.
Try this card with different Designer Series Papers, colors of card stock and stamp sets. They’ll take on an entire different “personality”. Have fun!
Remember: July is Bonus Days Month
You and I can start earning Bonus Days coupons! There is no limit to how many coupons we can earn, so it’s the perfect time to get items on your wish list from the current catalog, Online Exclusives, Kits Collection, and more. Here’s the deal: For every $50 USD | $60 CAD you spend between now and July 31st (before shipping and tax), you’ll get a $5 USD | $6 CAD coupon that can be redeemed during the month of August. So let’s start shopping and earning! My first July order is including (actually it’s starting with…) the gentle Inked & Tiled stamp set, Inked Botanicals 6″ x 6″ DSP and the beautiful Lost Lagoon Bordered Ribbon. Yes I have enough flower stamps but these are funky and I’m lovin’ ’em. Great greetings as well.
Thank you so much for popping in today. Please leave a comment below if you’re looking for a specific project or technique. And don’t forget to make a card and then make someone’s day by sending it to them.


