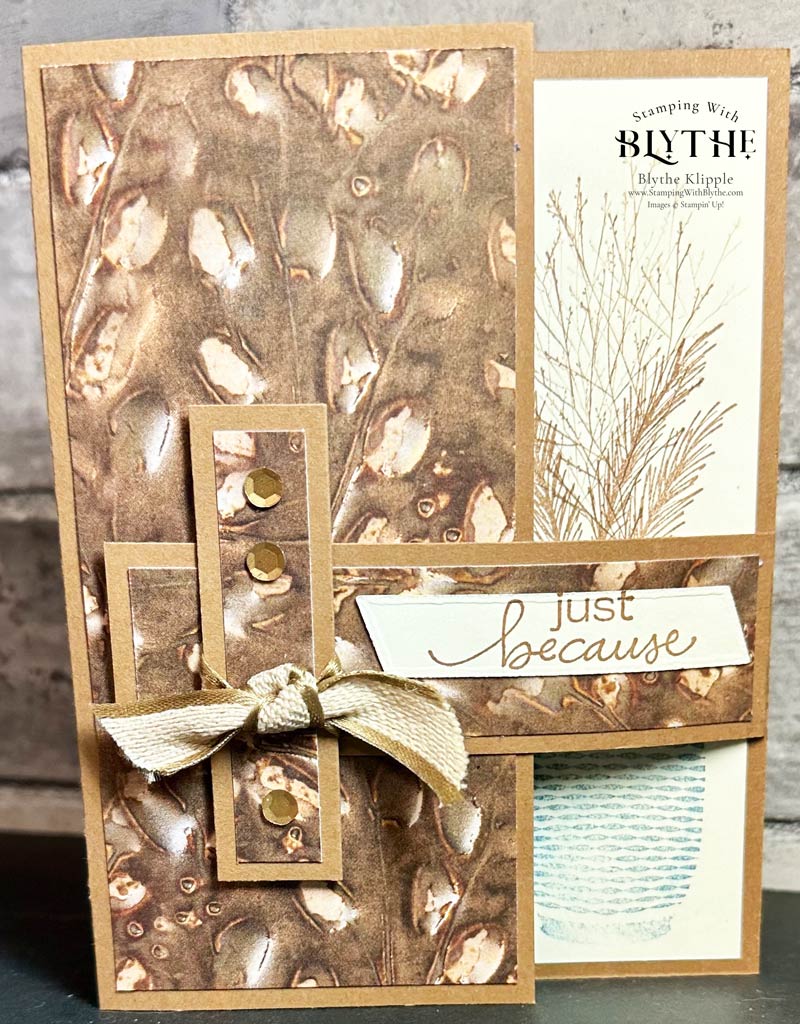
Once again I’ve joined a quarterly online stamping retreat and early bird signups receive a series of four challenges to create if they choose to. Well of course I choose to! Today’s Belt & Buckle Card is my interpretation of the project. I hope to try another version, maybe Hallowe’en or Christmas themed as soon as I find another window of free time!

Although this card looks kind of busy and complicated, it’s really quite easy. Prep (cut) your card stock and Designer Series Paper ahead of time and then enjoy the assembly!
- Card base: Copper Clay: 8-1/2″ x 5-1/2″, scored at 4-1/4″ — cut off 1-1/2″ from the card front (front flap) and trim that cut off piece to 4-1/2″. Score this smaller piece at 4″. This is your Belt Buckle.
- Belt Loop: Copper Clay: 3/4″ x 2-1/2″
- Inside card: Very Vanilla: 4″ x 5-1/4″
- Designer Series Paper (DSP) pieces: Front flap (outside and inside): 5-1/4″ x 2-1/2″ (2 pieces!); Buckle: 1″ x 3-3/4″; Belt ‘loop’: 1/2″ x 2-1/2″
- Greeting: Very Vanilla: whatever size/shape to coordinate with your chosen greeting.
Putting Your Card Together
- Belt Buckle (Copper Clay): fold on that 4″ score line and attach this piece to the inside of the card, right side, about 1-1/2″ from the bottom by placing your glue (I prefer Multipurpose Liquid Glue) on that little folded back 1/4″ bit of card stock.
- Attach the Very Vanilla card stock to the inside (right side!) of your card — right over the little flap you just placed. You can stamp this Very Vanilla layer before or after attaching it to the card if desired.
- Lay this ‘belt’ piece over the Very Vanilla layer and then attach the 1″ x 3-3/4″ DSP to the top side.
- Attach the 2-1/2″ x 5-1/4″ pieces of (DSP) to the outside and inside front of card flap.
- Attach the remaining piece of DSP (1/2″ x 2-1/2″) to the belt loop. Place a Dimensional at each end of this piece. Attach it to the card so it will accommodate the ‘belt’ sliding through it.
- Using a Glue Dot, attach a knotted piece of ribbon to the bottom end of the belt loop as shown. Then attach two sequins (or bling of your choice!) above the ribbon and one sequin below.
- Stamp, die cut, punch or snip your greeting and attach it to the buckle. I chose the just because phrase because it can fit almost any card need.


Supplies Used:
Product List“Fluffing” the Envelope
To make this already lovely card stand out when it lands in some deserving person’s mailbox, consider adding a 2-3/8″ x 5-3/4″ scrap of the same DSP you’ve been using to the outside flap of the envelope. Use a LIGHT layer of Multipurpose (“green”) Glue on the outside envelope flap, gently lay the DSP into position and then turn the envelope over and trim off the excess DSP with Paper Snips.
If you’re interested in purchasing any of the Stampin’ Up!’ products I used in today’s card, just click the item in the graphic above and you’ll be linked directly to my Stampin’ Up! Online Store. Don’t hesitate to contact me — via email: Blythe@StamingWithBlythe.com — or in a comment below if you have any “how-to” questions or my directions didn’t quite make sense. I pretty much write them as I do them.
Thank you so much for popping in today. Please leave a comment below if you’re looking for a specific project or technique. And don’t forget to make a card and then make someone’s day by sending it to them.


