Let’s take a few minutes to Celebrate You with Dainty Delight Stamps and coordinating Designer Series Paper. It’s so much fun – and so easy – to create cards using both a stamp set and a coordinating Designer Series Paper. Have you noticed that Stampin’ Up! has finally begun using the same name for both a stamp set, matching dies and its coordinating Designer Series Paper (if applicable)?! It makes it so much easier to identify what belongs with what!
In the case of the Dainty Delight grouping, the Designer Series Paper (aka DSP) was found in the now ‘retired’ Sale-a-Bration brochure and it was called Dainty Flowers. Hopefully you were able to earn a package of it…..but that’s water under the bridge now.
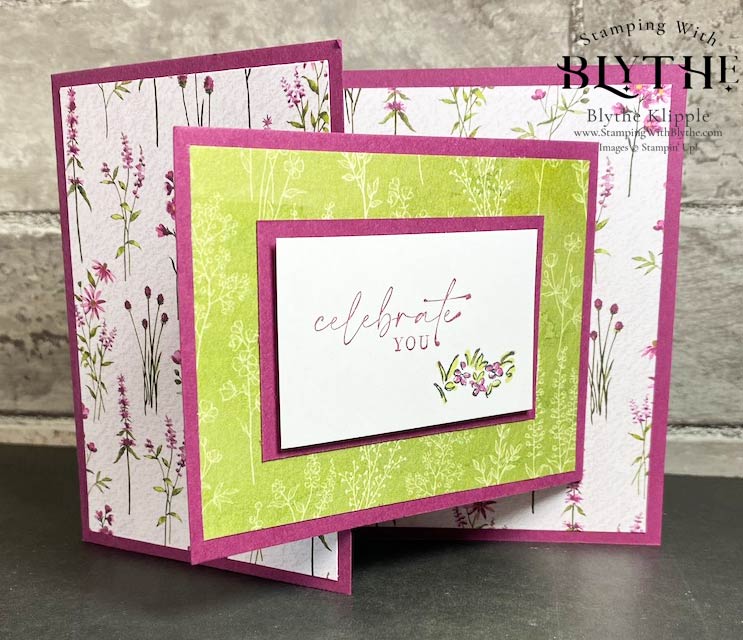
In the case of the card below I was able to use both the Dainty Delight stamp set and the Dainty Flowers DSP. I took advantage of the Sale-a-Bration opportunity because I knew I wanted to use these coordinating products in several classes. Actually I “earned” 3 packages of the DSP. I’ve been able to create cards for my own use plus share a bunch for classes.

Quick and Easy Card
You can use any Designer Series Paper and coordinating card stock to re-create this card. Just follow the measurements below.
- Card Base (Rich Razzleberry): 8-1/2″ x 4-1/4″, scored at 5-1/2″
- DSP layers: 5-1/4″ x 4″ (pattern needs to be horizontal — wider than taller) and 3-3/4″ x 2-3/4″ (pattern needs to be vertical – taller than wider)
- Inside “flap” (Rich Razzleberry): 8″ x 3″, scored at 4″ (This is where the greeting and message are placed.)
- DSP for front of “flap”: 3-3/4″ x 2-3/4″ Be sure that any pattern is horizontal–wider than taller.
- Basic White for inside of “flap”: 3-3/4″ x 2-3/4″ (for writing your message)
- Greeting base layer (Rich Razzleberry): 2-3/4″ x 1-3/4″
- Greeting layer for stamping (Basic White): 2-1/2″ x 1-1/2″
Remember, you can use any stamp set and any DSP and and card stock to create a similar fun fold card.

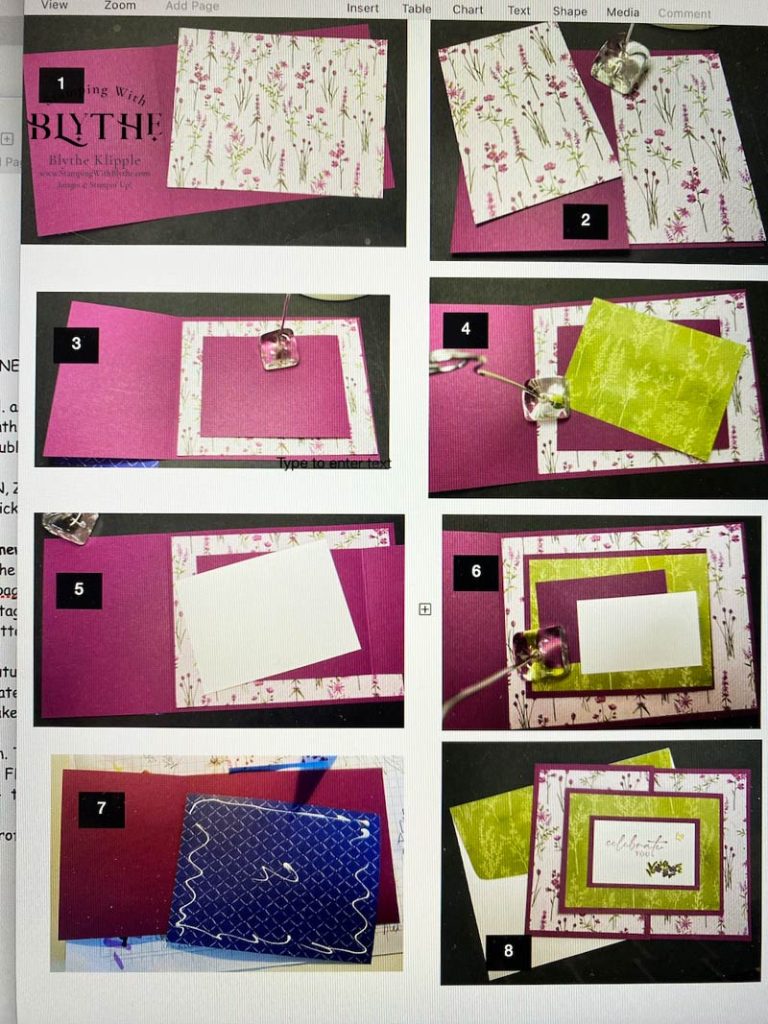
The image above is a test, compiling each step in creating this card in one concise photo. It’s not quite what I was imagining so I’m going to makes a comment on each numbered image.
- Image 1: Attach 5-1/4″ x 4″ DSP to card front using adhesive of your choice. I usually use “green glue” aka Multipurpose Liquid Glue. See image 7 for how I apply it.
- Image 2: Attach DSP to card front (folded at score line).
- Image 3: Attach the 8″ x 3″ folded piece of Rich Razzleberry card stock to the center front of the card being sure that the fold is on the right side. (not the normal left side)
- Image 4: Attach 3-3/4″ x 2-3/4″ DSP to the front of the folded piece of card stock you just added to the card front.
- Image 5: Attach the 3-3/4″ x 2-3/4″ Basic White card stock to the inside of the folded piece of Rich Razzleberry card stock.
- Image 6: Attach the remaining/smallest Basic White greeting layer to the coordinating Rich Razzleberry layer and attach both to the flap layer. You can stamp the greeting layer before or after attaching it to the flap.
- Image 7: Refer to Image 1……showing how the spread the “green glue” to the DSP layer.
- Image 8: Finished card and ‘fluffed’ envelope flap. Attach a 2-1/4″ x 6″ coordinating piece of DSP to the outside of the flap with “green glue” and then trimmed the excess with Paper Snips.
I hope you’ll create your own version of today’s card using a favorite Designer Series Paper and it’s coordinating card stock.
News to be aware of: at the end of this month Stampin’ Up! is going to be announcing a ‘color refresh’. That means we’ll be losing some of our color friends, gaining some new color friends and welcoming some previously retired color friends back into our family. That’s all I know about the “color refresh” right now.
More news: Yup, prices will be going up slightly on quite a few products in the new 2023-2024 Annual Catalog. This new catalog won’t be live until May 2nd. You might want to stock up (don’t go wild now) on some of the products that will have this increase. That includes card stock, Designer Series Paper, specialty paper, notecards and envelopes, Classic Stampin’ Ink Pads and refills, Stampin’ Blends, Stampin’ Write Markers, Stampin’ Cut & Emboss Machines and plates, embossing folders, punches, storage pieces, clear blocks, select tools, select adhesives, select stamp sets and Paper Pumpkin. The price increases won’t be large but they will all be happening at once. So….. if there are certain products you want or certain color ink pads/refills that you don’t already have, it might be wise to order them soon, like before the end of the month.
Colors haven’t changed for quite a while, except for the In-Colors that rotate in and out every year, so it’s really time for this to happen. And prices going up are just a part of life these days. Stampin’ Up! does the best they can to hold prices steady for as long as possible as they know the impact they have on Demonstrators (such as me) and you, our customers.
What colors do YOU think might be leaving the “family”? What colors might return??? Honestly I’m stumped. I’m hearing the music from ‘Jeopardy’ in my mind, ticking the minutes and days away!


