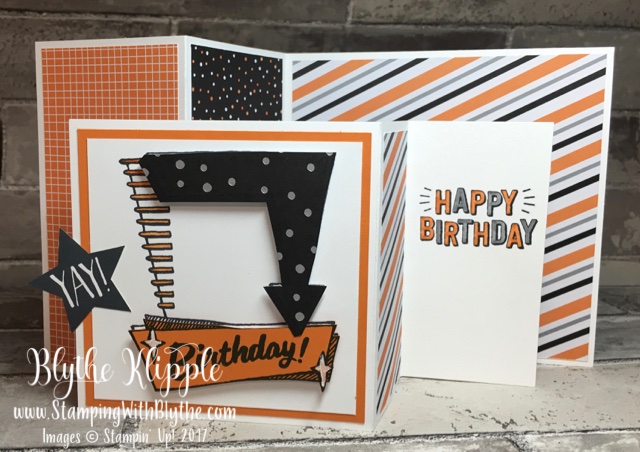
May is another giant birthday month in our circle of friends and family. Today’s card is honoring my San Francisco Giants fan grandson who has just turned an amazing 13. When I saw this Double Z Fold card on Amanda Bates’ UK blog I knew it was going to become Austin’s birthday card. Somehow.
I followed Amanda’s instructions using scrap computer paper until I was (fairly) sure about the measurements and then I went for it! It order to achieve the Giants look of orange and black I used the retired Halloween Fright Night Designer Series Paper, Marquee Messages stamp set and the Confetti Celebration stamp set. Both stamp sets will carry over to the soon-to-be-release 2017-2018 Annual Catalog. By the way, if you don’t yet have one of the new catalogs and don’t have a demonstrator who takes care of your catalog/stamping needs, I’d be glad to send you one. Just send me an email, blythe@stampingwithblythe.com , with your mailing and contact information.


Yes, I did a lot of ‘fussy cutting’ on contrasting layers of card stock but it was definitely worth it!
Double Z fold card cutting and scoring instructions:
- Whisper White Thick card stock (140272) 5-1/2″ x 11″ AND 4-1/4″ x 8-1/2″
- Scoring: (larger piece) landscape position: 2-3/4″ and 5-1/2″
- Scoring: (smaller piece): landscape position: 2-1/8″ x 4-1/4″
- Designer Series Paper (2 patterns) Panels: 2-1/2″ x 5-1/4″
- Designer Series Paper-large square: 5-1/4″ square
- Z-fold your card layers
- Pumpkin Pie card stock layer (105117): 4″ square plus scrap for stamping ‘birthday’
- Designer Series Paper Panel Layer: 1-7/8″ x 4″
- Whisper White card stock layer (100730):
- Layer (on top of Pumpkin Pie layer): 3-3/4″ square
- Miscellaneous bits of patterns from the Designer Series Paper Pack for stamping, fussy cutting and layering on the main stamped panel.
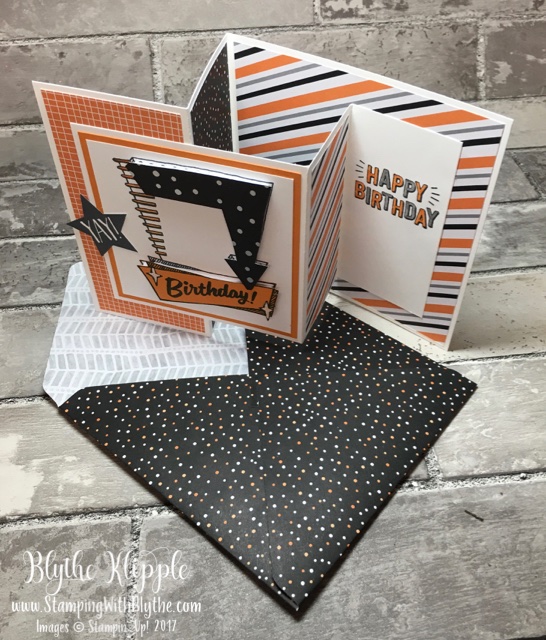
Finished Double Z fold card plus larger envelope made with Stampin’ Up!’s Envelope Punch Board.
When attaching the two layers, experiment with how they lay when folded. It will NOT be a perfect fit. I’ll be working on another card for that perfect fit but in the meantime this really does work. Secure the right panel first. Place Fast Fuse or Multipurpose Liquid Glue on the back of the right panel. Lay on 5″ x 5″ panel and secure. Then ‘fiddle around and locate the best position for the larger left panel. Place adhesive of choice only over the area that will be attached to the back panel and attach so the card fully closes. It will NOT open flat but will open so that it stands for display. Displaying it is important because your card will be so cool.
Try the Double Z fold card. I really think you’ll like it! And if you have any questions don’t hesitate to send me an email. I’m always available to help you succeed.


Simply Stunning Blythe… and thank you so much for sharing with me.. I do appreciate that…
And as I said in my email… funnily enough the tutorial for the fully opening version of this card is up tomorrow…
Austin is a lucky 13 year old!!!
You know I’ll be checking it out Amanda. 🙂
That is a great looking card and it looks even better in person! Nice meeting you in Dublin.