A few days ago I posted about re-finding an old post about Magazine Files. Actually mini magazine files. I also suggested a link to a 2017 tutorial I made for one of the files. Oh my gosh!! The making of the file is so much easier than that tutorial.

Here’s a fresh and far superior revision, sketched as I was trying to interpret the 2017 tutorial! The outline of the 11″ x 12″ paper is not really sketched in the proper proportions.

Product List
|
|
|
|


You just need to add your card stock and Designer Series Paper and twine/ribbon.
Now let’s try these clean and fresh instructions:
-
- Trim a 12″ x 12″ piece of card stock to 11″ x 12″.

-
- On the 11″ edge, score at 4-1/2″ and 6-1/2″.
- On the 12″ edge, score at 6″ and 10-1/2″.
- Turn card stock back so the 11″ edge is at the top and score 2-1/4″ from either edge between the 6″ and 10-1/2″ score lines.
- Cut with scissors (Paper Snips) or carefully with your Paper Trimmer along the 6″ and 10-1/2″ score lines to the spine (diagonal hash lines) on each side of the spine.

Take a deep breath. It’s assembly time.
- As you’re instructed to fold here and there, be sure to burnish your folds with a Bone Folder. That will yield nice, crisp folds.
- I prefer Tombow Multipurpose Adhesive (aka Tombow) for securing the following layers. Before it dries, you can slide the card stock around as needed.
-

Fold on score lines as shown above. 
Fold on the ‘spine’ line 
Apply Tombow adhesive to both sides of the left and right bottom flaps 
ALSO Apply Tombow to inside of flaps as shown - Tuck the smaller flaps between the folded layers and firmly press the layers so “everyone” is stuck securely.

Pinch ends securely so they don’t ‘gap’ open.
- Tuck the smaller flaps between the folded layers and firmly press the layers so “everyone” is stuck securely.

-
- Pull the larger flaps on each side of the spine and tuck them inside the base.
- Carefully make a small pencil ‘tick’ where the side flap touches the base on each side.

Lay the two sides flat out and make two more tick marks 1/2″ from each side of the spine. (below)


Designer Series Paper Trim:
- Cut two pieces of coordinating Designer Series Paper: 1-3/4″ x 12″ and 1-3/4″ x 2″
- Score one end, gently, at 3/8″. Score the other end, gently, at 7/16″. Wrap the DSP (Designer Series Paper) around the magazine file, creasing at each front corner. Now apply adhesive on all edges of the DSP, and wrap around box, starting and ending at the back of the file, watching your positioning along the bottom. Mine is about 1/8″-1/4″ above the bottom. Attach (glue) the 1-3/4″ x 2″ piece over the gap at the back.
Back side of finished ‘magazine’ file:

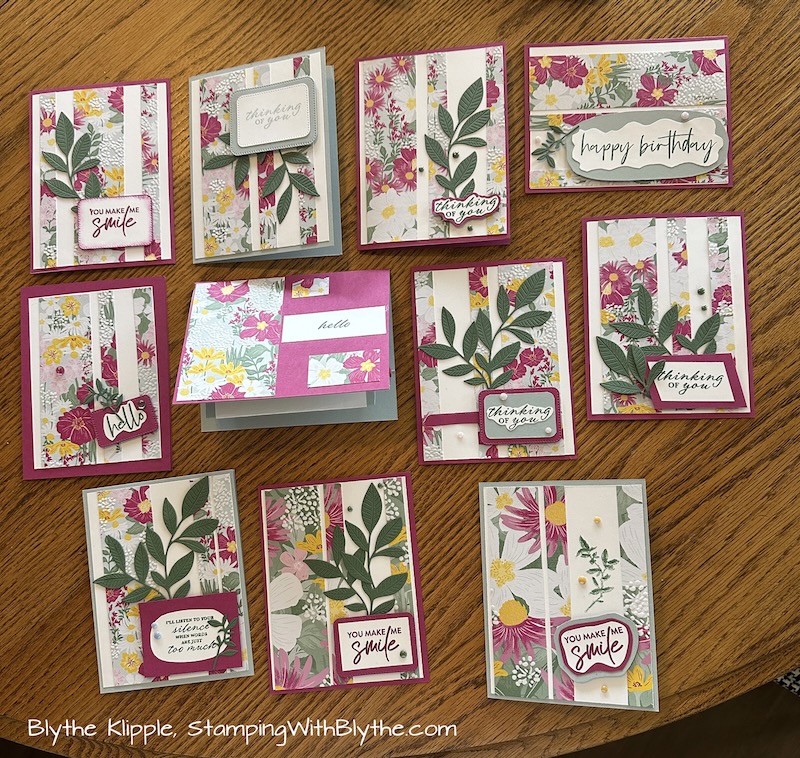
Tomorrow I’ll share the sets of cards I made to place inside each file. Once you cut and assemble one file I think you’ll be hooked. I made four after making the first one today. I plan to make many more, fill them with cards and give them as gifts.
* Shop Stampin’ Up! in Blythe’s Store * Like my Facebook Page * Follow me on Pinterest * Join Paper Pumpkinand play along * Shop Stampin’ Up!’s Clearance Rack and save up to 60% * Join My Country Loft Team